$0.00
Adding Buttons to Garments – July 2020
How many times have you completed your garment/object and you just need to add the buttons, and you’ve stalled, or it then doesn’t look right? The key is to take time and plan. I’ve noted below a few tips I’ve picked up for adding buttons and avoiding mishaps.
- Choosing your buttons. Purchase the buttons before making the buttonholes – this way you can make sure the buttonholes fit the buttons, rather than the other way around, which limits your choice of buttons. I find it best to have a small swatch made of the yarn you are using with a button hole or two to see how they may look on your garment. Consider also the scale of your button:
-
- Small buttons for fine yarns;
- Large buttons for heavy yarns;
- Shank buttons for thick fabrics.
- Make your own button. If you can’t find a button that works, make your own – either in the same yarn (if you want the button to blend) or in a contrasting colour if you want it to stand out. Do this before making your buttonholes as noted above. See our free pattern for some easy and simple crocheted button ideas.
- Use the same yarn to attach your button. Finding the same colour sewing thread to match your yarn is often difficult. Even if it is close, and no-one else notices it – it will always be there to haunt you. Use the same yarn you used for the garment instead – if it is too thick for the button holes, split it in half to make it thinner.
- Use your yarn tails to attach your button. To help keep the buttons secure and less likely to ‘pop off’ at inconvenient times, use the yarn tails from where you finished off. This may require you to weave the yarn through from the end to where the button goes. If possible sew one button on, tie the knot and weave the yarn to the next place for the button. This may require you to leave very long tails.
- Add a small stay button. Help secure your button, stop it wobbling or coming through your crochet fabric add a button on the wrong side of your work. This is sewn on at the same time as sewing on your actual button. The stay button should be flat, have the same number of centre holes and be about the same size as your actual button.
- Secure the edges of the buttonhole. Buttonholes in crocheted work do tend to stretch over time. Initially make them snug for the button you are using. You can also stop the stretching or minimize it, by reinforcing the edges of the buttonhole. There are several ways to do this:
-
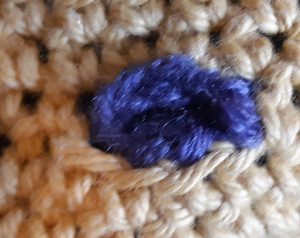
- Make a round of chains around the edge of the buttonhole – giving it a look similar to surface stitch
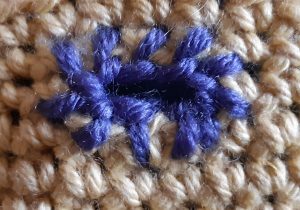
- Sew a round of buttonhole stitch (similar to the blanket stitch but with a knot at the top) or blanket stitch around the edge.
(Each pictured here with a contrast colour to demonstrate the look, but these would normally be done in the same colour)


